 The video lesson plus written recipe features how to make sprouted grains at home and thus make your homemade sprouted flour for all your baking needs.
China is credited with developing the method for germinating seeds many centuries ago and on long ocean voyages, Chinese sailors used sprouted mung beans as a source of vitamin C for preventing scurvy.
Vitamin C is produced in significant quantities when you sprout seeds. It is absent from unsprouted seeds! Many other nutrients are increased substantially from sprouting grains, as I go over in the videos.
Sprouting Grain
Sprouted flour made from freshly ground sprouted grain is one of the 3 ways traditional societies used to prepare their grains before eating.
This careful preparation of wheat and other grains is necessary in order to break down the antinutrients, toxins, and difficult to digest proteins (i.e., gluten) so as to optimize digestibility and to allow maximum absorption of nutrients.
Unfortunately, this careful preparation method has been lost with our modern cooking methods which focus on speed and convenience rather than nutrient density and digestibility!
Equipment Needed to Sprout Grain
The first item you need to sprout is a half gallon size glass container with a screen lid (like this one). Many health food stores sell sprouting jars, but you can easily make one yourself at home using a glass jar and a clean pair of pantyhose cut to fit the lid of the jar and fastened with a rubber band.
Once you have your jar ready, fill it no more than halfway with the grain you wish to sprout. I use organic spelt or organic soft white wheat that I obtain from my local grain co-op. For other ideas, visit my Resources page.
Sprouting Grains Recipe
How to sprout grains at home easily and cost effectively that will improve the nutrient value of your baked goods. Recipe can be used to sprout any types of grain.
Instructions
-
Place the wheat berries in the sprouting jar and affix the screen lid.
-
Rinse and drain the wheat grains several times with filtered water until the berries are completely wet.
-
Fill the jar until almost full with water and let the berries soak overnight on the kitchen counter.
-
The next morning, tip the jar and drain out the water using the screen lid to prevent the berries from spilling out. Rinse the wheat one more time and then invert the jar and let it sit at an angle to facilitate draining and allowing the circulation of air.
-
Rinse the wheat one more time and then invert the jar and let it sit at an angle to facilitate draining and allowing the circulation of air. I use my grain grinder as a support for the jar so that the draining occurs right over the kitchen sink.
-
Every few hours, rinse the wheat again and reset the jar in the draining position.
-
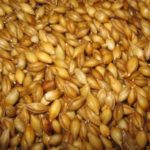
In anywhere from a few hours to a few days (depending on the time of year and warmth/humidity in your home), small white buds will appear on the ends of the wheat kernels. See the picture for what it should look like.
-
When this occurs, pour the sprouted wheat kernels into baking pans and place in a dehydrator or a warm oven (150 F/ 66 C) for about 24 hours until fully dried.
-
Store the sprouted grains in an airtight container in the refrigerator, or grind immediately and then freeze the sprouted flour. Use sprouted flour just like you would use regular flour in your favorite baking recipes.
Sprouted Grain Recipes to Try
Baked goods made with sprouted flour are much more digestible/filling. As a result, you will find that you eat much less of the same item when you use sprouted flour!
Try making this sprouted flour pizza crust or these sprouted flour brownies with your sprouted flour!
Where to Find Organic or Already Sprouted Grain
If after watching these two short videos on sprouted grains below you have interest in trying your hand at making your own sprouted flour for baking, please visit my Resources page for where to buy quality sprouted grains for grinding into fresh sprouted flour (my favorite is einkorn … completely unhybridized wheat) or to locate suppliers of organic grain for making sprouted grains at home yourself.
How to Make Sprouted Grains (Videos)
The two videos below demonstrate how to sprout grains. The first video shows the soaking process and the second the sprouting process.
Sarah, The Healthy Home Economist
More Information
Teff Grains (sprouted or not) Deliver Big on Nutrition
Amaranth: Superfood of the Aztecs


Hello Sarah,
I have a question regarding soaking flour. Is soaking just for flour that is not sprouted flour? I get confused between the two! I want to order some sprouted flour, but not before all the flour I currently have is used up. Could I soak this flour that I currently have on hand the way you explained in the video, or is it still no good?
My oven only goes down to 170 degrees, is that a low enough temperature to dry the grains or will that cook them?
Nevermind…I just saw the post above where you answered this same question 🙂
Wait, so the best way to use the flour is to sprout, grind and then soak before making the recipe? Or is sprouting enough? and if it is enough then what kind of flour are you using when you soak? regular flour? Sorry, this is very new to me and I am trying to figure it out! loL!
Hi Sarah,
Do you know anything about the carbohydrate content when you sprout or soak grains? My boyfriend has high triglycerides, and we’re trying to find ways to cut back on carbs. Since we’re just getting into sprouting and soaking, I wasn’t sure how this affected that aspect. Or do you know where I might be able to find additional info on that? Thanks!!
I sprouted the grain and used my regular recipe to make bread… it was very, very wet and the bread came out heavy and dense. Do you have recipes that you use when you use the sprouted grain flour?
Thanks!
Anything above 150 will cook the sprouted grains and not just dry them. If you have a digital oven, you can adjust the 175F down to 150F (just consult the owner's manual for your oven to find out how to do it for the model you have). Or, you can use a dehyrator instead.
Sarah,
I want to try sprouting however my oven will only start at 175 F not 150. Is that too hot for drying 24 hrs?
Hi Elaine, refrigerating the sprouted/dried wheat prior to grinding is fine. There is probably additional value to soaking or sourdoughing the sprouted flour. I do not have any information or experience with this to share, however.
Hi Sarah – I have sprouted several batches of various grains and dehydrated them for use later on. I am storing them, unground, in my refrigerator – I hope this is the best choice (?) I like having the sprouted flour available if I don't remember to start the soaking process in time! Also, I don't want to get into overkill, but I do want to be as careful as possible — do you think there is value to sprouting and then soaking or using a sourdough process? Thanks so much!
I am in the process of sprouting hard white wheat right now. I want to make bread with it. I have used a recipe in the past(before I knew anything about proper preparation or real food for that matter). The recipe calls for lecthin, gluten, yeast, olive oil, honey,and water. Are these things okay? I think I could probably get away with not putting the gluten or the lecthin in it, but not sure what type of yeast to use. Any suggestions? Or recipes for good sandwich bread?