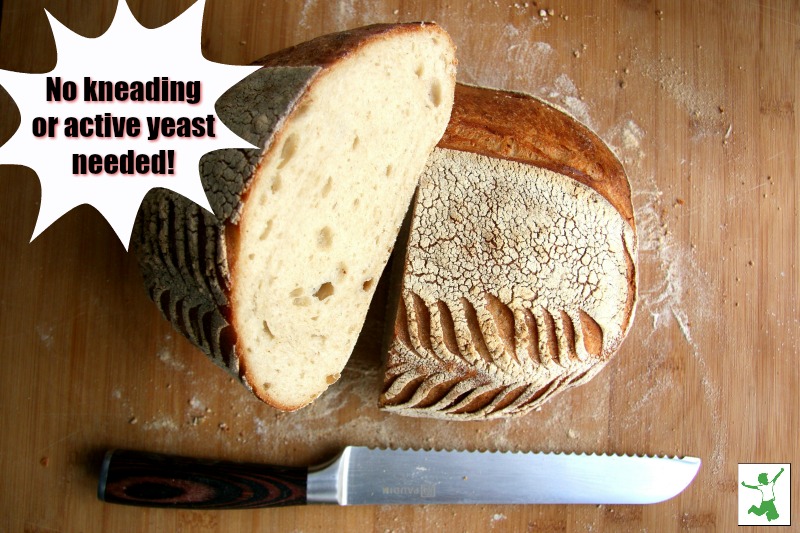
Easy, no knead recipe for einkorn sourdough bread with only 3 ingredients and no active yeast required for extra digestibility and more easily assimilated nutrition.
I am so excited to add this amazing recipe for no knead einkorn sourdough bread to the catalog of nearly 400+ Real Food recipes (including 16 bread recipes) on this blog!
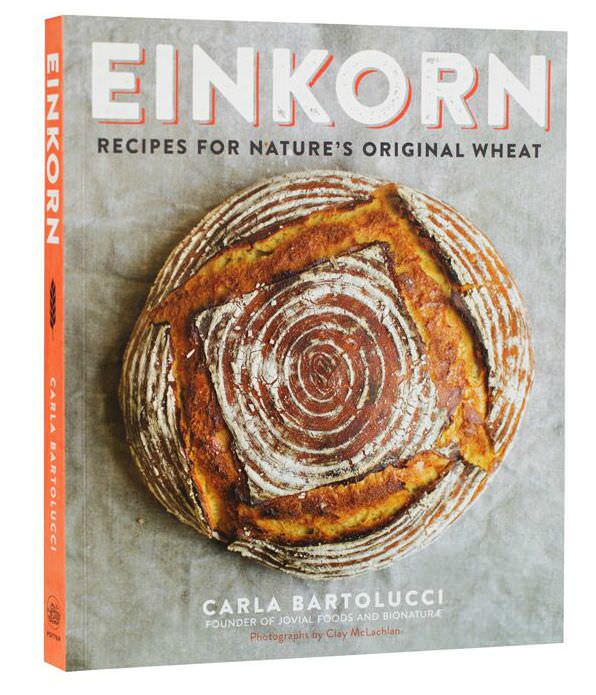
This authentic, yeast free sourdough creation comes from Carla Bartolucci, one of the world’s foremost experts in the cultivation and traditional preparation of einkorn, the only nonhybridized form of wheat on Planet Earth. For many (non-genetically) gluten intolerant people, this is the only wheat they can eat and enjoy without symptoms.
Carla’s book Einkorn: Recipes for Nature’s Original Wheat is a treasure trove for anyone who values ancient culinary traditions using ingredients such as einkorn that have safely nourished and delighted humanity for millennia.
For those of you who are new to bread baking and sourdough in particular, this is a recipe you should try first because it requires no kneading or shaping of the dough. Despite the little effort required, the resulting loaf looks like an artisan produced it!
The only catch is that you really need a 5-7 quart Dutch oven for baking. Simply mix together the ingredients in the evening before you go to bed. In the morning, fold the dough into a rough round, and your fresh einkorn sourdough loaf will be out of the oven in less than an hour!
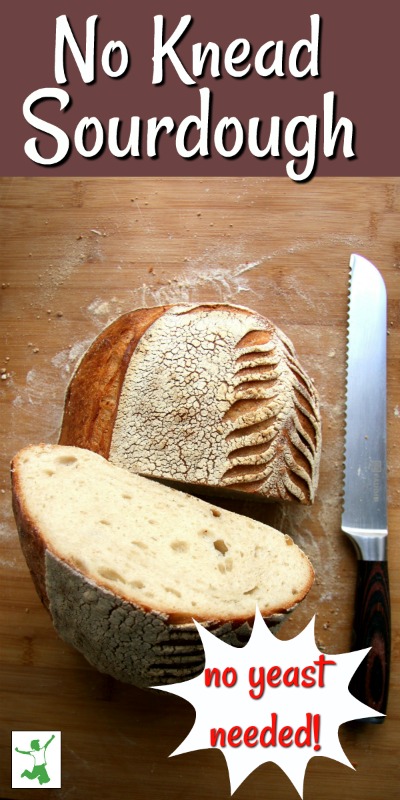
Homemade Sourdough
Thank you, Carla, for your generosity in allowing the reprinting of this fantastic homemade sourdough bread recipe, but most importantly, for writing this book … it is truly a gift to the world.

No Knead Sourdough Bread Recipe
Easy recipe for no knead sourdough bread using einkorn flour that even many gluten intolerant people can enjoy.
Ingredients
- 2 cups (474 g) warm filtered water 100°F/37.8°C
- 1/4 cup (60 g) refreshed sourdough starter see einkorn-based recipe below
- 6 cups (720 g) all-purpose einkorn flour
- 1 1/2 tsp sea salt finely ground
Instructions
-
In a large bowl, mix together the water and yeast or starter until dissolved and creamy. Add the flour and salt and mix until all of the flour is absorbed and you have a sticky dough. Cover the bowl with plastic wrap and let rise in a dark place for 10 to 15 hours until the dough has doubled in size.
*Note that if you choose the yeast starter, your loaf will not convey the health benefits of sourdough. More on spotting fake sourdough at the store in this article.
-
Generously flour a work surface and transfer the dough to it. Use a dough scraper to fold the dough in thirds, dusting with flour as you go, then cup the dough with both hands and rotate in a circular motion between your hands until you have a tight, round loaf. Dust the top of the dough generously with flour.
-
Place a linen layer in a colander, heavily dusted with flour. Place the loaf seam side up in the colander, then fold over the linen to cover. Let proof at room temperature for 30 minutes.
-
Place a Dutch oven with the lid on in the oven. Preheat the oven to 500°F/260°C for 30 minutes.
-
Remove the pot from the oven and take off the lid. Invert the loaf and place it in the pot seam side down. Shake to center it, but if it sticks to the side leave it. Cover and place in the oven.
-
Reduce the oven temperature to 450°F/232°C and bake for 40 minutes. At this point, you can remove the pot from the oven and take off the lid. If you like your loaf darker, return the uncovered pot to the oven for 5 minutes.
-
Lift the loaf out of the pot with oven mitts. Place on a wire rack to cool for 2 hours before slicing. Wrap the loaf in a clean cotton or linen kitchen towel for up to 3 days, or freeze in a sealed plastic bag for up to 1 month.
Recipe Notes
1⁄4 teaspoon active dry yeast may be substituted for the einkorn sourdough starter in a pinch. Using sourdough starter will result in a more digestible loaf, however.
7 1⁄4 cups (696 g) whole grain einkorn flour, plus more for dusting can be substituted for the 6 cups of all purpose einkorn flour.
Hint! Once you’ve made your loaf, save the crusts and check out this recipe on how to make breadcrumbs.
How to MAKE an Einkorn Sourdough Starter
It will normally take 6 to 10 days to get your starter strong enough to bake great bread. At that point, the starter may be stored in the refrigerator and refreshed just once a week. You can create and maintain the starter with either all-purpose or whole grain einkorn flour. The whole grain flour contains 100 percent of the seed and a bit more of the wild yeasts, which can help things to move along quicker in the beginning, but both flours will end up working equally as well.
MAKES 1 CUP OF STARTER
TO BEGIN THE STARTER
3 tablespoons (45 g) warm water, at 100°F/37.8°C
1⁄2 cup (60 g) all-purpose einkorn flour or 1⁄2 cup (48 g) whole grain einkorn flour, plus more for dusting
TO FEED THE STARTER
2 tablespoons (30 g) warm water, at 100°F/37.8°C
1⁄2 cup (60 g) all-purpose einkorn flour or 1⁄2 cup (48 g) whole grain einkorn flour, plus more for dusting
TO FEED AND FINISH THE STARTER
2 tablespoons (30 g) warm water
1⁄2 cup (60 g) all-purpose einkorn flour or 1⁄2 cup (48 g) whole grain einkorn flour, plus more for dusting
(a) In a small bowl, mix together the water and flour with a fork to form a wet dough. (b) Dust your hands lightly with flour, scrape up the dough, and roll gently between your hands into a sticky ball without adding more flour. (c) Transfer to a sealable glass jar or container, or simply leave it in the bowl and tightly seal with plastic wrap. Store the bowl in a dark place for 48 hours where it is at least 68°F/20°C.
After 48 hours of resting, the starter should smell sharp and have expanded minimally, with bubbles visible under the pale gray surface of the dough. (d) With a fork, gently push aside and discard the gray surface of the dough. (e) Gather up the remaining starter and transfer it to another medium bowl. Add the water and mix until the mixture is smooth and creamy. Add the flour and mix until a wet dough is formed.
Dust your hands lightly with flour, scrape up the dough, and roll gently between your hands into a sticky ball without adding more flour. Transfer to a clean and dry sealable glass jar or container or to a clean bowl and tightly seal with plastic wrap. Store in a dark place for 24 hours where it is at least 68°F. (Some say you should cover the container with a cotton towel so the starter is able to catch wild yeasts in your kitchen. However, all of the wild yeast you need is already in the flour, and the added air can form a skin on the surface of the starter.)
After the fed starter has rested 24 hours, it should begin to change from a sharp to a sweeter, yogurtlike smell. You should begin to see bubbles not only under the surface of the dough, but also on top. (f) If you still see a grayish hue on the surface of the starter, push it aside with a fork and discard it. Add the water and mix until the mixture is smooth and creamy. Add the flour and mix until a wet dough is formed. Dust your hands lightly with flour, scrape up the dough, and roll gently with your hands into a sticky ball without adding more flour. Transfer to a clean and dry sealable glass jar or container or simply transfer to a new bowl and tightly seal with plastic wrap. Store in a dark place for 24 hours where it is at least 68°F/20°C.
After this final 24 hours, you may bake with the starter, but it will not be as mature as the starter used in my recipes. (g) Therefore, the proofing times will need to be increased from 3 to 5 hours to 12 to 15 hours, or your bread may bake dense until you have the proper balance of acids. I recommend strengthening your starter even further before you mix your first loaf of bread. To do this, you should refresh your starter (see page 13 of Einkorn cookbook) at least 5 times until it bubbles up and subsides in less than 5 hours after each refreshing. You can still bake great bread while your starter is maturing, by using Yeast Levain (page 14 of Einkorn cookbook) and mixing in the excess starter you have each time you refresh.
The same recipe for refreshing is used to strengthen your new starter and to maintain your mature starter forever. Once your starter is strong enough to leaven the dough in the times indicated in each recipe, you will only need to refresh your starter weekly to keep it strong. However, if you are away, even for a few weeks, your starter will survive just fine without refreshing if stored in a sealed container in the refrigerator. (I’ve given you quantities for refreshing your starter based on how many loaves of bread you might want to make each week.)
How to REFRESH an Einkorn Sourdough Starter
makes about 1⁄3 cup (100 g), enough for 3 loaves of bread per week
2 teaspoons (10 g) Einkorn Sourdough Starter
2 tablespoons (30 g) warm water, at 100°F/37.8°C
1⁄2 cup (60 g) all-purpose einkorn flour or 1⁄2 cup (48 g) whole grain einkorn flour
makes about 2⁄3 cup (165 g), enough for 5 or 6 loaves of bread per week
4 teaspoons (20 g) Einkorn Sourdough Starter
1⁄4 cup (56 g) warm water, at 100°F/37.8°C
3⁄4 cup plus 1 tablespoon (100 g) all-purpose einkorn flour or 3⁄4 cup plus 1 tablespoon (90 g) whole grain einkorn flour
Refreshing Directions
Place the starter in a small bowl. Add the water and mix with a fork until the mixture is smooth and creamy. Add the flour and knead to form a firm ball. Roll the starter between your hands until the flour is absorbed; add a tiny bit more if it seems overly sticky, but the dough should remain very moist. Store in a large sealed container (so you have room for the starter to expand) for 6 to12 hours. The starter will bubble up and then subside. Refrigerate the starter until you refresh it again. Remember to always leave your einkorn starter in a dark place because light can oxidize the carotenoids in the flour.
To bake bread, you will remove a small piece of the starter to mix a sourdough levain the night before baking. Some recipes will also call for kneading the dough straight with the starter. Remember to monitor the amount of sourdough that remains, because you will always need to have at least 2 teaspoons (10 g) for refreshing.
Remember: The original einkorn starter you create can survive forever and be passed on to your children, so make a note of when you begin so you’ll know how old your starter is as the years pass! If you need tips on safely storing sourdough starter for when you go on vacation or take breaks from breadmaking, this linked article tells you how.
More Information
Can Celiacs Eat True Sourdough Bread?
Make Your Own Sourdough Starter
Kefir Soaked Einkorn Loaf
Einkorn: The Good Gluten You Can Probably Eat Just Fine
Einkorn Sourdough Crackers with Nut Butter
The 4 Reasons Why I Switched to Einkorn Wheat


If I understand correctly, this recipe is made with “white” Einkorn flour, right? So the bran is removed? I’m on the quest to find a sourdough recipe that can be made with freshly ground wheat berries (so it would still have all the bran.) Any thoughts?
The recipe uses freshly ground, whole einkorn 🙂
Thank you for the recipe! I was wondering if you’ve ever used sprouted einkorn flour to make the starter. I’m not getting the grayish hue on the surface. More like a crusty white layer that can’t just be moved aside.
Can the dutch oven be cast iron or does it have to be enamel?
Cast iron is fine.
By now I guess I’d be considered an experienced artisan bread baker (about 99% of the breads I bake use a natural leavening), but only recently have I been experimenting with einkorn, thanks to Carla’s book! What a great flavor this grain has. Once I got used to working with the stickiness of the dough of bread made from einkorn (low, weak gluten), it’s been fun to experiment with – and taste testing. I can buy Jovial’s AP flour at a local store, but I order my whole einkorn from Jovial and grind myself.
What size dutch oven is recommended?
I feel the same way as Jess from the January 2018 post.
I’m a little confused as to what to do with the rest of the starter; though I went ahead and separated them in 4 jars each. I followed the 1-1-1 ratio (starter, flour & water) and am storing all of them in the refrigerator.
The only thing is if I only need to use 2 tsps of starter for baking bread, I am going to end up with so much starter as I’ll need to feed them once a weekend.
Please help me understand this portion of the recipe!
Thank you Sarah!
I am a little confused…the recipe says to use refreshed starter but then in the starter refreshing recipe it says to make a levain. It says to use 1/4 refreshed starter so am I not making the levain the night before? Sorry if this this is a bad question. I just haven’t done this before so its all new to me.
Once the starter is refreshed, then you can use it to make the sourdough levain which is made the night before baking the loaf. Making the levain is not actually part of the refreshing process. Hope that helps.
Ok thank you!
But I actually had to put it in the fridge for 1 week and 1/2. I will follow the instructions above on refreshing the starter.
Just need to clarify. Will I need to let it sit for 12 hours first? Since I am refreshing it? Then I can go ahead and bake my first loaf of bread and let it proof for 10-15 hours before baking?
Part of the refreshing process is letting it sit for 6-12 hours in a large sealed container. This needs to be done before mixing it with water, salt and flour to rise for 10-15 hours and then baking the loaf.
Thank you! But I actually need to know if I can just go ahead and use the starter after the last stage of feeding the starter and finishing it.
And proof it to 15 hours. Did I understand
it correctly?
Yes, you can use it immediately. Let it rise for 10-15 hours in a dark place until the dough has doubled in size.
Aloha!
And THANK YOU so much for posting this recipe! ???? So, I just finished the 3rd stage of making the starter. I fed it and finished it. I just need clarification on strengthening the starter. Do I need to refresh it 5 times before I can start baking with it?
And if I don’t strengthen it, do I proof it to 15 hours instead of 12 hours and that should take care of it?
I will store this starter in the refrigerator until I hear back from you. I’m really excited to bake my first sourdough bread but I’m containing myself in case I didn’t do it right.
Look forward to hearing from you soon ????
Perhaps this article can be of assistance in answering your questions. https://www.thehealthyhomeeconomist.com/storing-sourdough-starter-short-long-term/