Sprouting Grains Recipe
How to sprout grains at home easily and cost effectively that will improve the nutrient value of your baked goods. Recipe can be used to sprout any types of grain.
Instructions
-
Place the wheat berries in the sprouting jar and affix the screen lid.
-
Rinse and drain the wheat grains several times with filtered water until the berries are completely wet.
-
Fill the jar until almost full with water and let the berries soak overnight on the kitchen counter.
-
The next morning, tip the jar and drain out the water using the screen lid to prevent the berries from spilling out. Rinse the wheat one more time and then invert the jar and let it sit at an angle to facilitate draining and allowing the circulation of air.
-
Rinse the wheat one more time and then invert the jar and let it sit at an angle to facilitate draining and allowing the circulation of air. I use my grain grinder as a support for the jar so that the draining occurs right over the kitchen sink.
-
Every few hours, rinse the wheat again and reset the jar in the draining position.
-
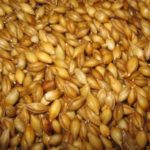
In anywhere from a few hours to a few days (depending on the time of year and warmth/humidity in your home), small white buds will appear on the ends of the wheat kernels. See the picture for what it should look like.
-
When this occurs, pour the sprouted wheat kernels into baking pans and place in a dehydrator or a warm oven (150 F/ 66 C) for about 24 hours until fully dried.
-
Store the sprouted grains in an airtight container in the refrigerator, or grind immediately and then freeze the sprouted flour. Use sprouted flour just like you would use regular flour in your favorite baking recipes.